In Head Office, you can create automated communications that can be published to a selected number, or to all TalkBox accounts that are connected to your Head Office account.
This article will show how to create and publish date triggered communications in 5 steps. The process is the same for other automated communications such as Birthday messages.
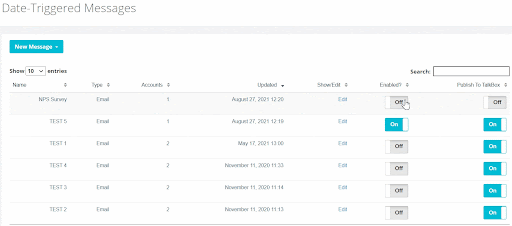
In TalkBox Head Office navigate to: Messages > Date Triggered
Step 1 : Create a new message
- Click on ‘New Message’ and select your communication channels such as email, SMS or email and SMS
- Create and review your promotion content. Learn more about creating emails in Head Office.
- Select ‘Save and Finish’ to progress to select the send details for your promotion
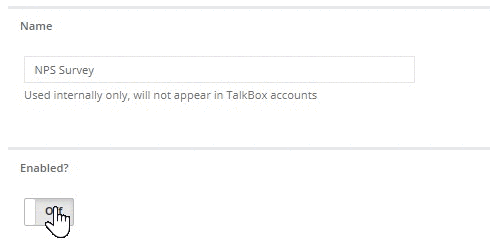
Step 2: Name your communication and enable it
- Name your communication
- Turn on the ‘Enabled’ switch if you would like to activate your communication, leave it ‘Off’ if you would like to publish the communications but leave them disabled for now
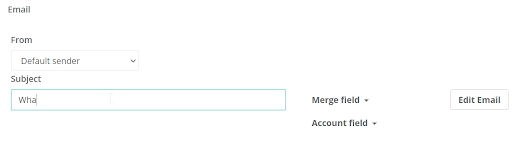
Step 3: Select the sender and create a subject line
- Select ‘Default sender’ to send from each individual TalkBox account’s default sender
- Click on ‘New sender…’ to create a new email sender
- Create a subject line and include a ‘Merge field’ or ‘Account field’
Step 4: Select your accounts and recipients
- Scroll down to select the TalkBox accounts and recipients within the Talkbox accounts you wish to send to
- Select all accounts, individual accounts or select accounts by ‘Account Groups’
- If you wish to send to all contacts, leave the recipients filters blank
- If you wish to target a specific group, you can filter the contacts by contacts ‘Who meet ANY of these conditions’ (When using multiple filter criteria if contacts meet at least one of the filter conditions they will be included in the send) or contacts who ‘Who meet ALL of these conditions’ (combine filter criteria and the contacts have to meet all the applied filter conditions to be included in the send)
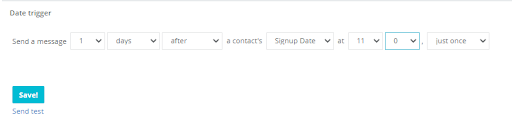
Step 5: Select your date trigger
- Edit the sending date parameters using the three drop-down options:
- Number – select any number from 1-30
- Period – select from days, weeks, months or years
- Offset – select ‘before’, ‘after’ or ‘on the day of’
- Select from any available date field in your account
- Choose a time of day for your communication to be sent
- You can also select to send the communication every year, this will send based on the day and month regardless of the year
- Click on ‘Save’ to save your communication
Step 6: Enable and publish your communication
- Go back to the ‘Date-triggered’ page (if you created a birthday communication, navigate to the ‘Birthday-triggered’ page)
- To publish the date triggered communications to the selected Talkbox accounts, turn the ‘Publish to TalkBox’ switch on, this will only publish the communication but they will remain disabled unless you turn on the ‘Enabled?’ switch