A welcome message or thanks for visiting is one of the easiest ways to keep your customers engaged and get a 2nd visit or purchase. You can set up a welcome message in TalkBox to send automatically after a customer signs up for the first time.
To create a welcome communication, you will need to set up a ‘Date-triggered’ automation. This article will guide you through setting this up in 4 steps.
Step 1: Create content & review content
Navigation: Automated > Date Triggered > Select ‘Add new”
- We recommend selecting both Email and SMS to ensure you reach 100% of your audience.
- When selecting your audience, prioritise Email as the primary channel; this reserves SMS for customers missing an email address.
- Create content using the drag & drop editor. If you need to refresh your skills, watch our Creating an email video here.
- Review content & send a test communication.
- If using merge fields, use “preview content for” to review your personalisation.
Step 2: Select your recipients
- Select who will receive the communication,
- Select ‘all contacts, which means the communication will be sent to any contact when they meet the trigger condition, which is signing up via any method you have connected to your TalkBox account.
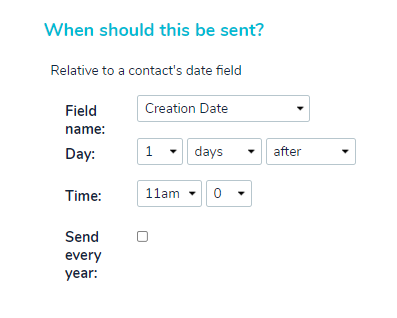
Step 3: Select your date trigger
- Select ‘Creation date’ from the ‘Field name’ dropdown.
- Edit the offset using the three drop-down options:
- Number – select any number from 1-30.
- Period – select from days, weeks, months, or years.
- Offset – select from before, after, or on the day of.
- It’s a good idea to send a welcome communication 1 or 2 days after the creation date.
Step 4: Confirm & launch
- Check that the recipient selection and trigger are both correct.
- Click the confirm button in the lower left of the page.
- Read through the details in the pop-up.
- Click launch to send or schedule (if a later date & time has been selected) your communication.